Many people have been asking how the Juki F600 (new kid on the block) compares to the Janome 6600 (established) in the way of sewing and features. Both are jammed packed with a number of features and over the course of a few weeks to months I will be putting both machines through their passes. I have owned the Janome 6600 since April of 2009 and have used it quite extensively. I have not however used any of the decorative stitches and for the purpose of this comparison will be.
I’ve noticed that many people are doing practice stitches on scrap fabrics which do give a great benchmark for how a machine functions, but practice stitches on scrap are not the purpose of these machines. They’re for quilting, garment making, home décor and many other projects people can think of. They’re designed to handle soft chiffons and silk as well as they do layers of denim and leather. So my goal in this comparison is to show you how they perform not only on scrap fabric but in practical applications. This is a multi week process, be patient. I have unlimited time now to sew since being laid off from work. So I will be making actual garments and quilts to emphasize how they function. I will be using fabric from chiffon to denim and weights in between. The aim is to break both down as much as possible to give those who are looking at either machine a comprehensive comparison.
First up is a comparison of the equipment and accessories that came with the machines. Both have a different set that comes with the machine and it may be necessary to purchase other feet. Standard feet included with the Juki HZL line are: Standard (zigzag), over-casting foot, buttonhole presser foot, manual buttonhole, overcastting foot, blind stitch, and zipper foot.
Exclusive feet for the Juki F600 are: Walking foot, Patchwork foot, open toe foot, free motion quilt foot, edge sewing foot, and smooth presser foot.
The Janome 6600 has its walking foot build right in, called the Accu-feed. Its function is similar to the Pfaff’s IDT but is wider and has more surface space. It is an attachment all in its own and works independently from the regular or standard feet. Included with it are: Standard (zigzag), overcastting, rolled hem 1/8”, quarter inch, over edge, zipper, satin stitch, blind hem, cording, automatic button hole, basting/darning/free-motion, open toe satin stitch and the Accu-feed foot.
Both machines come with bobbins, 4 needles, quilt bar, thread stops for small and large spools, seem ripper, t-key for removing screws, and knee press.
I pulled out both sets of feet which are photographed for you to examine, the standard number included on the 6600 is 14, but I count 13 unless the quilt bar counts as a foot. While I was photographing these feet I decided to pull the shank off of my Janome and test it on the Juki feet. They are interchangeable. This is great news for those that do not have a Juki dealer nearby where they can pick up Juki brand accessories. Personally this is a great discovery as I am planning on leaving the Accu-feed foot down on the 6600 permanently once this comparison is finished. Here are the pictures of this discovery.
Both of these machines are computerized and therefore use plastic bobbins. While photographing them for comparison purposes I noticed they too are interchangeable. This is good news as I have tonnes of Janome bobbins around the house. It will save me quite the expense using what I already have and don’t’ need more of.
At first glance the manuals stick out like a sore thumb. The Juki manual being the larger of the two, there are a few reasons for this. One is that the image format is larger requiring more pages to show what the Janome manual does on one page and two it has more in it. The Juki machine manual has basic sewing instructions for “zippers”, “shearing”, and “pin-tucks”. The Janome manual includes instructions for “zippers”. I’ll be going over the manuals a bit at a time as I get to each different feature on both machines. But this is a general overview. The Juki manual is 102 pages the Janome is 92 pages.
Similar features on both machines are: Knee lift, thread cutters, drop in bobbin, needle left or right, stitch length, needle up/down, start/stop button, twin needle capabilities and free motion. I’m sure that these machines have a bunch of other similar features but from comparing the manuals this is what I could find. If I find more they will be addressed later.
One major difference when flipping through the manual is that the Juki has no defined modes. The Janome has three modes which break down the stitches. I’ll start with the Janome since its method is familiar and common on other machines. Mode one is the basic stitches, that includes the straight stitch, lock stitch, and zigzag. Mode two is the quilting and patchwork stitches. I am personally not familiar with these stitches. Mode three is the utility and decorative stitches. Button holes and overlocking stitches are included here. The F600 has four methods for choosing patterns.
1. is the direct patterns, similar to mode one.
2. is “123” or numerical. This allows the user to enter the stitch pattern number directly. Ex. Decorative stitch is labelled “65” choose “123” button and type in “65” the design will be recalled.
3. is “abc” for monogramming, the numbers correlate to letters of the alphabet which are displayed on the number pad.
4. is ‘one point’. I actually do not understand how this method works and will explain it better once I’ve physically tried it out. There are no mode changes and trying to remember which mode your stitches are in with the F600.
That is about as far as I can go for the moment without physically setting the machine up and it will be Monday December 21, 2009, before I will have time to do so. The biggest differences are going to be how it actually sews, and both machines will have their strengths and weaknesses. Dimensions will be posted once the machine is set up, I don’t think the ones I have are accurate and want to take them again.
NOTE: Images are coming; I need to find my camera cable to transfer them.
Thursday, December 17, 2009
Wednesday, December 16, 2009
Resolutions Already!
As 2009 draws to a close with Christmas being about a week away its time to start thinking of those dreaded New Year’s resolutions. I rarely ever make any as I just don’t seem to follow them or use them as a guide line for what I want to accomplish in the year 2010. But this is what I’ve come up with; they’re simple, streamlined and somewhat attainable.
1. Keep sewing space organized and tidy so that it can be used whenever by either my mother or I. This includes finding a spot for the Juki F600 that is currently sitting under my desk.
2. Sew 10+ metres of fabric per month, for a combined goal of 120 metres by December 2010. Try to bring in less than goal of new fabric.
3. Sew more from pattern books such as La Mia Boutique and Burda.
4. Clean out UFO's and try to finish off 2 for every new item started. Try to keep new item and UFO's coordinated, if UFO was never finished due to nothing matching.
5. Finish Halloween costume in time for Halloween.
6. Add embroidery to more projects if appropriate.
7. Learn how to digitize better and create embroidery designs.
8. Make more dresses and skirts
9. Start silk-screening and hand dying fabrics.
10. Quilt more
Friday, November 27, 2009
Christmas Ornaments and other Mishaps
It’s been a while since I’ve updated, too long really, I have been far too busy getting sick this month to get much done. I have however begun work on a pile of Christmas ornaments that I need to make for the 19th of December and beyond. I worked out that I need about 60+ of these little ornaments which at a running time of 25 minutes each a few days of nonstop work. I try to set the embroidery machine up on weekends when my boyfriend is over playing video games, but lately that not been the case, I’ve spent my nights and weekends sleeping to fight off the flu. I do however have a decent pile started, but 50 or more to finish. I bought 4 large King cones of Robison-Anton rayon embroidery thread for this project in evergreen, gold, red and white, the king cones last longer and are more economical than the mini-kings.
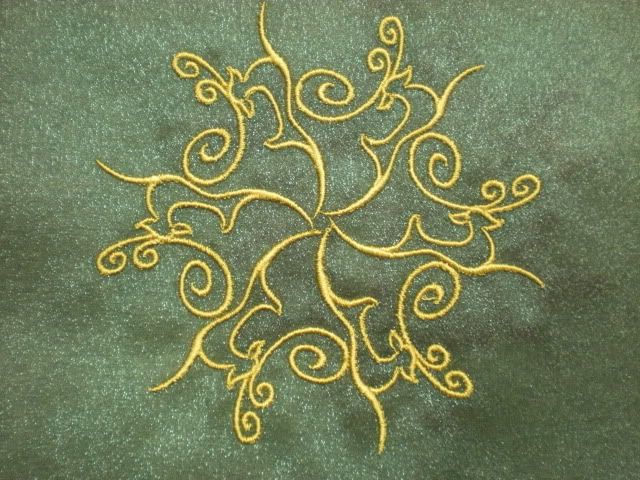
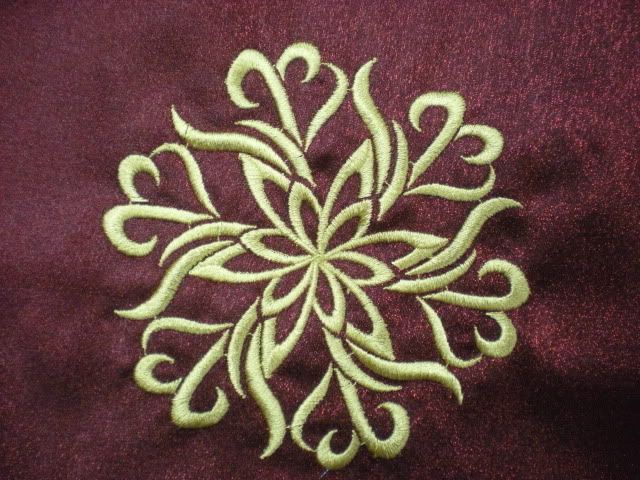 Designs shown are from embroidery library as well, they’re the set of Symbol Snowflakes.
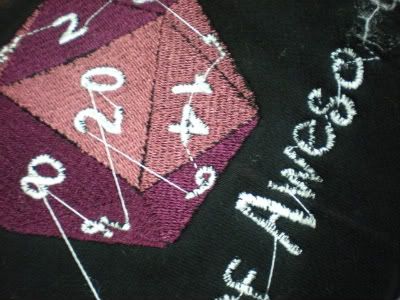
I also tried another embroidery design, this time on sweatshirt fleece. I’d like to put this one on some hoodies for my sister and I. We both love playing Dungeons and Dragons so this design speaks greatly to us. I think it’s a lot smarter and intelligent than some of the other d20 designs and slogans out there. Unfortunately the tension on my machine was to high when testing this out, but it’s a good thing I stitched the full design out or I would not have seen how much It needed adjusting, the larger “mistakes” are further in the design. It’s a good test; I love how it looks stitched out and how it will once the tension mistake has been corrected. This design is from Urban Threads.
The project idea was borrowed from Embroidery Library. Its two layers of organza and one layer of water soluble stabilizer with a design embroidered onto the organza. This was sort of the first time I did a large scale project with my embroidery machine in its new home, so it was quite exciting. My mother even came down to see it up and running permanently.
Designs shown are from embroidery library as well, they’re the set of Symbol Snowflakes.I also tried another embroidery design, this time on sweatshirt fleece. I’d like to put this one on some hoodies for my sister and I. We both love playing Dungeons and Dragons so this design speaks greatly to us. I think it’s a lot smarter and intelligent than some of the other d20 designs and slogans out there. Unfortunately the tension on my machine was to high when testing this out, but it’s a good thing I stitched the full design out or I would not have seen how much It needed adjusting, the larger “mistakes” are further in the design. It’s a good test; I love how it looks stitched out and how it will once the tension mistake has been corrected. This design is from Urban Threads.
The other project I have been working on is Burda 108-7-07, which are skinny jeans, in a dark navy blue. I actually discovered while trying them on that the denim is very slightly elastine, maybe 2% at the most, it’s slight, but they’re going to fit very well. There has been a few mishaps as these are my first pair of jeans but, I’m pleased with how they’re turning out even if has meant getting creative with my sewing skills. They’re about half done and I expect that I shall be finishing them up right away before I tackle my boyfriends western style shirt for the holidays.
Tonight is cutting out squares for a quilt or working on the jeans. I ran out of embroidery needles and need to pick some up before I can continue with the ornaments.
Wednesday, October 21, 2009
Christmas before Halloween
I’ve been taking my time and putting a list of what to make for friends and family for the Christmas holidays. There’s only about two full months until it arrives and even less time for some friends and family we see before the holidays really begin. If I want to make anything it means starting well in advance and actually sticking to it and not playing video games. So Christmas has to start now, I can’t waste any more time. I might be picking up more hours if my job does cut my hours down. I can handle it for a little bit, but not for too long. I do have debts to pay off just like everyone else and with the prospect of school money and working as much as possible does weigh heavy on my mind.
As a result of this shock from work I’m trying to be as economical as possible, small gifts, with the exception of my sister who I purchased her gift well before I found out my hours are going to get hacked if it continues to be this slow.
Several months ago I purchased a new Jenome 200e embroidery machine on sale; it’s a basic machine with a hoop size of 140mm x 140mm (5.5” x 5.5”). I’ve tested it out only a few times for tiny little designs to get a feel for it but until now haven’t had a permanent location for it. It’s now sitting on a trunk in my room. It’s a semi-out-of-the way location behind my desk which makes for sitting in my room painting and working on a design more manageable.
For the vast majority of my family they will be getting bottles of homemade vanilla and some fabric ornaments. Pretty simple I think. As for the rest of the family, there is a lot of work that needs to be done. But the list appears as follows.
Mom: Embroidered tree skirt
Sister and Brother in law: Queen sized flannel quilt
Boyfriend: “Cowboy” shirts
Little cousins: Jumpers and jackets
That’s what I have planned so far. I doubt it will get more complicated than that or I would never finish on time. I have also ordered a ‘free’ embroidery program Stitch Era Universal. I say ‘free’ as I have to pay for shipping which is fine it’s much more affordable than many of the programs available for digitizing. I create vectors on a regular basis and this program should, as it is advertized to, convert vectors into an embroidery design with almost no hassle. The benefit to this is that my boyfriend would like some Calavera skulls for ‘cowboy’ shirts, but he’s very picky about the design meaning I have to create them myself. After creating in Corel Draw I really don’t have the patience to waste another million ours digitizing it in the same way I created it. It’s a personal frustration as I put hours of work into my vectors, I am hoping this will be an easy remedy to the problem and I can spend more time sewing than tinkering on the computer.
Friday, October 2, 2009
Just some thoughts and cold weather
It’s that wonderful time of year again; crisp autumn air, frost in the morning, the crunch of leaves under your feet. I love the whole feel of autumn and the approach of winter. I just HATE the cold. The onset of winter normally throws me downstairs and into my sewing lair. This year has been a little bit different. Here in Edmonton we went from 34 Celsius to 15-20 Celsius in a matter of 48 hours. Unfortunately that extreme drop in temperature has caused my poor body to seize up with extreme pain. This is why I hate the cold. No sewing for me until I adjust to the new cooler temperatures and the new pressure. In the mean time I’m trying to keep busy, I can’t sit for prolonged periods of time and my hands are too stiff for careful detailed work. So I’m cleaning and organizing my sewing space and art supplies. Fabrics are being organized a bit better. Right now there is no real system in place for how they’re organized; fabric is getting crammed into every corner available. It’s not fun, I would rather be sewing, but it needs to be done.
If done right I should be able to put out the embroidery machine on a semi-permanent basis for holiday sewing as well as my easel. Much of this will rely on getting the numerous baskets of UFO’s completed once and for all and unloaded onto the unfortunate souls who they were meant to be made for long ago; mainly my ‘little’ sister. I’ve got many pairs of pyjamas for her that only need elastic and hemming before I can hand them over to her and a few skirts that need to be hemmed as well. I just have this thing for not finishing items when their near completion.
In my organizational efforts the past few weeks I have pulled out the fabric for a few quilts that I need to make for the holidays. One is for my sister. She’s getting a lot this holiday season; I just noticed that, I have a tendency to spoil my little sister even though she is 21.
I’ll post my holiday sewing list in a few days once I finish organizing everything. The only real sewing I’ll be up to is practicing a front fly zipper for jeans and working on the wardrobe contest.
Wednesday, September 16, 2009
I decided to start a blog. I’ve been toying with the idea for some time to keep me on track, I hope, and more motivated. I’ve been having difficulties organizing my thoughts properly recently and thought that maybe, just maybe, a blog might help.
Among the many things that need help organizing is my sewing agenda. I get too many ideas and end up rushing into many projects either too quickly or not fast enough, getting bored and starting many at one time. This often leads to the feeling of “I’ll never get anything finished” and “why did I bother”.
The goal is to get organized, motivated and finishing projects left for way to long. The other goal would be to have some minor coherent thought and plans executed for once.
The items at hand would be the massive stash of fabric I have unfortunately accumulated over the past three and a half years I’ve been sewing. I bought a brand new machine back in April in the hopes that I could finally get something done. While the machine has no problems, has been used more frequently than the old Kenmore I previously owned, things are still not getting done. I just have to high of expectations for myself and never seem to meet them. I have a mound of UFO’s (un-finished objects) stacked up next to my machine and a pile I WANT to get too desperately but never have. I can plan till I turn blue at what I want to sew, tell myself that I will sew once I get home from work, but fall through, end up on the computer chatting or playing “The Sims 2.” So it’s obvious that this is a major problem. There is nearly 2000 metres of fabric in the basement, all of which are mine. I’m not even counting what my mother has.
The second problem is trying to go back to school. I dropped out of ACAD in 2006 due to illness and it’s something that I’ve regretted since. I’m dying to finish my last two years there. This means I need a portfolio. I have one, but ACAD from what I know requires pieces to be no older than 2-3 years old. That leaves me with virtually nothing in my portfolio other than a few minor vectors and what is currently in my sketchbook. For a third year entrance I would need 20-25 pieces done and delivered to them by March 15, 2010 leaving with about six months to do a lot of work. I’ll probably work on extra to make sure its solid enough. The biggest problem though is the space. Being at home in my parents basement leaves me no room to leave paints, canvas, paper and crayons out. If I was to plan out a portfolio right now in terms of media choice and what I would include, it would sort of follow this pattern.
3 Digital works, vectors, designs, photography
3-5 tonal studies, greyscale (charcoal, graphite, ink)
3-5 pastel paintings
5-10 paintings, acrylic and watercolour
3-5 Mixed media; collage
3-5 silkscreen and textiles
Sketchbook
Subject matter is something that would follow. As someone who prefers photo-realism over anything else I’d like to try and branch out, experiment a bit. In my second year I was very, occupied with ancient societies, their designs, culture and art along with mechanical things like cars. Mixed media and collage are my weak points; I’ve never been very strong at incorporating extra elements into a painting or drawing. It’s something that I need to improve on. My declared major is painting, which is why the vast majority of any new portfolio would have a large chunk dedicated to just painting. As for the sketchbook, well, it would allow the judges to see the process, colour palettes, failed compositions, doodles, progression and information that they would otherwise see in the class but can’t with a completed portfolio. I find it quite important to include for them, I was often told that I included a tonne of information and thought behind each piece I did, colour samples and the like.
Ultimately I would like to incorporate the use of fibres into my paintings either via embellishing or direct subject matter. I keep scraps from the garments I make which could add interesting texture to canvas or paper and maybe even supply an alternative ground.
That’s where I’m going with all this. Trying working things out, finding a direction and recording what does and doesn’t work. It would enable me to have quick access to what I was thinking at certain times. I could write down a progression of new techniques tried, update with photos and keep it for my future reference. This blog isn’t going to just be dedicated to painting and art. As mentioned above I sew and that too will be featured here when new items are started and finished.
I’d like to try and keep a list of pattern numbers recorded and the progress of the portfolio on the side as well as a tally as to how many metres I have used up to date. I keep a chart on my sewing room white board so adding it to this blog shouldn’t’ be too difficult.
Onto other things. I am currently working on a wardrobe contest at http://sewing.patternreview.com/
The goal of the contest is to by the end of November have 10 pieces that co-ordinate with each other. We were given extra time to think about and start planning the wardrobe and co-ordinating fabrics and pieces and many did storyboards which showed their choices. There are some great plans being displayed. For myself I chose a theme of “The Pink Panther” which are colours of Rose/Pink, grey, ivory and black accented with gold. The colours came from the interior and exterior of my father’s 1959 Rambler Ambassador. This car has been an inspiration for many projects in the past; it is such a unique vehicle.
That was the storyboard I worked on at the beginning with a few patterns tossed around matched to fabrics. I can easily say that it is changing and quite a bit. There are a few pieces that are still the same but the fabric linked to them has changed. I’m debating right now whether or not to add a corset into the mix which would be worn over the blouses much like a vest. It is still to be decided.
Subscribe to:
Posts (Atom)